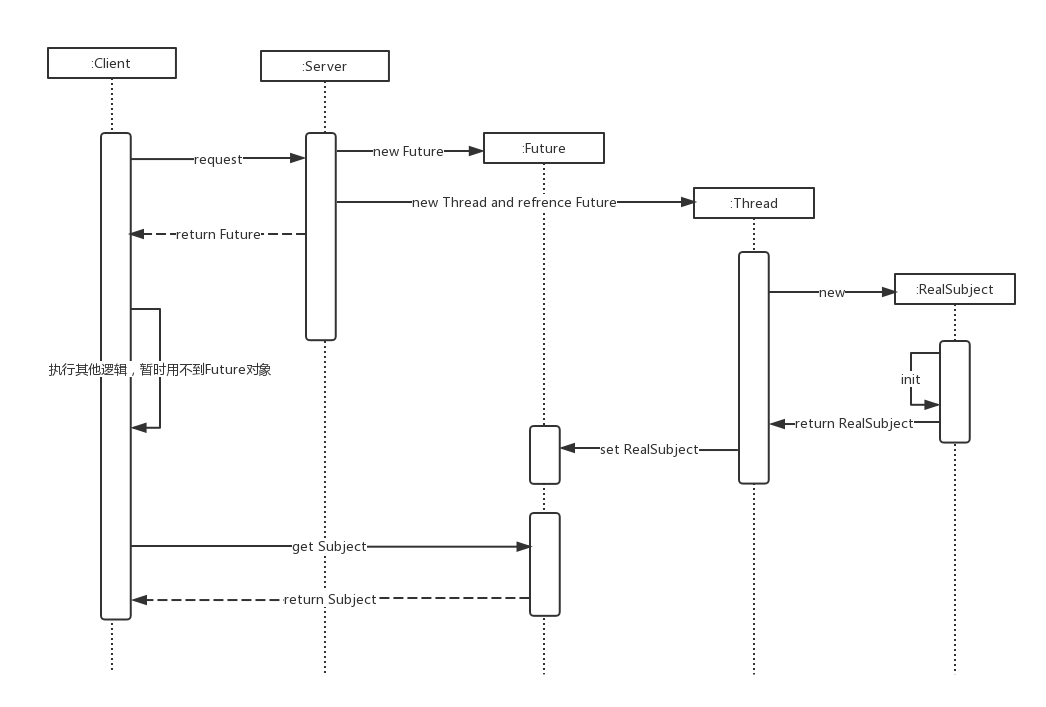
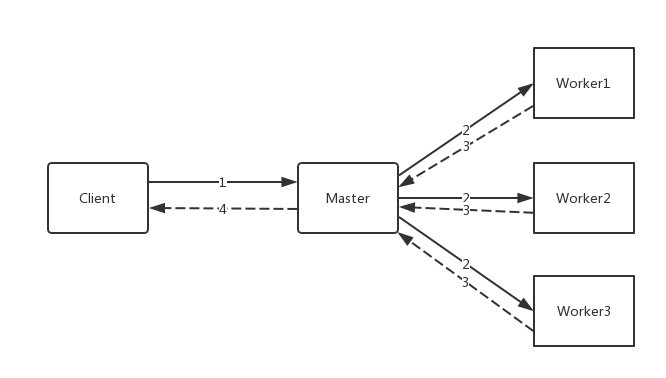
文章目录
  1. 1、Future模式
  2. 2、Master-Worker模式
  3. 3、生产者-消费者
  4. 4、单例&多线程

1、Future模式

示例:
1
2
3
4
5
6
7
8
9
10
package com.example.part_04_designPattern.demo001;

/**
* 定义数据格式接口
*/
public interface Data {

String getRequest();

}
1
2
3
4
5
6
7
8
9
10
11
12
13
14
15
16
17
18
19
20
21
22
23
24
25
26
27
28
29
30
31
32
33
34
35
36
37
package com.example.part_04_designPattern.demo001;

public class FutureData implements Data {

// 真正的数据
private RealData realData;

// 真正的数据是否已经准备好
private boolean isReady = false;

public synchronized void setRealData(RealData realData) {
// 如果已经装载完毕了,就直接返回
if (isReady) {
return;
}
// 如果没装载,进行装载真实对象
this.realData = realData;
isReady = true;
// 进行通知
notify();
}

@Override
public synchronized String getRequest() {
// 如果没装载好 程序就一直处于阻塞状态
while (!isReady) {
try {
wait();
} catch (InterruptedException e) {
e.printStackTrace();
}
}
// 装载好直接获取数据即可
return this.realData.getRequest();
}

}
1
2
3
4
5
6
7
8
9
10
11
12
13
14
15
16
17
18
19
20
21
22
23
package com.example.part_04_designPattern.demo001;

public class RealData implements Data {

private String result; // 最终结果

public RealData(String queryStr) {
System.out.println("RealData:根据" + queryStr + "进行查询,这是一个很耗时的操作..");
try {
Thread.sleep(5000);
} catch (InterruptedException e) {
e.printStackTrace();
}
result = "查询结果";
System.out.println("RealData:操作完毕,返回结果:" + result);
}

@Override
public String getRequest() {
return result;
}

}
1
2
3
4
5
6
7
8
9
10
11
12
13
14
15
16
17
18
19
20
21
22
package com.example.part_04_designPattern.demo001;

public class Server {

public Data request(final String queryStr) {
// 1 我想要一个代理对象(Data接口的实现类)先返回给发送请求的客户端,告诉他请求已经接收到,可以做其他的事情
final FutureData futureData = new FutureData();
// 2 启动一个新的线程,去加载真实的数据,传递给这个代理对象
new Thread(new Runnable() {
@Override
public void run() {
System.out.println("Server:启动一个线程,去获取RealData");
// 3 这个新的线程可以去慢慢的加载真实对象,然后传递给代理对象
RealData realData = new RealData(queryStr);
futureData.setRealData(realData);
}
}).start();
System.out.println("Server:响应FutureData");
return futureData;
}

}
1
2
3
4
5
6
7
8
9
10
11
12
13
14
15
16
package com.example.part_04_designPattern.demo001;

public class Main {

public static void main(String[] args) throws InterruptedException {
Server s = new Server();
System.out.println("Main:发送请求");
Data data = s.request("请求参数");
System.out.println("Main:获取到FutureData!");
System.out.println("Main:做其他的事情...");
Thread.sleep(3000);
System.out.println("Main:开始请求最终结果...");
String result = data.getRequest();
System.out.println("Main:获取到最终结果:" + result);
}
}

执行结果:

1
2
3
4
5
6
7
8
9
Main:发送请求
Server:响应FutureData
Main:获取到FutureData!
Main:做其他的事情...
Server:启动一个线程,去获取RealData
RealData:根据请求参数进行查询,这是一个很耗时的操作..
Main:开始请求最终结果...
RealData:操作完毕,返回结果:查询结果
Main:获取到最终结果:查询结果

2、Master-Worker模式

​ Master-Worker模式是常用的并行模式。它的核心思想是系统由两类进程协作工作:Master进程和Worker进程。Master负责接收和分配任务,Worker负责处理子任务。当各个Worker子进程处理完成后,会将结果返回给Master,由Master做归纳和总结。其好处是能将一个大任务分解成若干小任务,并行执行,从而提高系统的吞吐量。

示例:
1
2
3
4
5
6
7
8
9
10
package com.example.part_04_designPattern.demo002;

public class Task {

private int id;
private int price;

// 省略getter、setter

}
1
2
3
4
5
6
7
8
9
10
11
12
13
14
15
16
17
18
19
20
21
22
23
24
25
26
27
28
29
30
31
32
33
34
35
36
37
38
39
40
41
42
43
44
45
46
47
48
49
50
51
52
53
54
55
56
57
58
59
60
61
62
63
64
65
package com.example.part_04_designPattern.demo002;

import java.util.HashMap;
import java.util.Map;
import java.util.concurrent.ConcurrentHashMap;
import java.util.concurrent.ConcurrentLinkedQueue;

public class Master {

// 1 有一个盛放任务的容器
private ConcurrentLinkedQueue<Task> workQueue = new ConcurrentLinkedQueue<Task>();

// 2 需要有一个盛放worker的集合
private HashMap<String, Thread> workers = new HashMap<String, Thread>();

// 3 需要有一个盛放每一个worker执行任务的结果集合
private ConcurrentHashMap<String, Object> resultMap = new ConcurrentHashMap<String, Object>();

// 4 构造方法
public Master(Worker worker, int workerCount) {
worker.setWorkQueue(this.workQueue);
worker.setResultMap(this.resultMap);

for (int i = 0; i < workerCount; i++) {
this.workers.put(Integer.toString(i), new Thread(worker));
}

}

// 5 需要一个提交任务的方法
public void submit(Task task) {
this.workQueue.add(task);
}

// 6 需要有一个执行的方法,启动所有的worker方法去执行任务
public void execute() {
for (Map.Entry<String, Thread> me : workers.entrySet()) {
me.getValue().start();
}
}

// 7 判断是否运行结束的方法
public boolean isComplete() {
for (Map.Entry<String, Thread> me : workers.entrySet()) {
/**
* Thread.State.TERMINATED:
* Thread state for a terminated thread.
* The thread has completed execution.
*/
if (me.getValue().getState() != Thread.State.TERMINATED) {
return false;
}
}
return true;
}

// 8 计算结果方法
public int getResult() {
int priceResult = 0;
for (Map.Entry<String, Object> me : resultMap.entrySet()) {
priceResult += (Integer) me.getValue();
}
return priceResult;
}
}
1
2
3
4
5
6
7
8
9
10
11
12
13
14
15
16
17
18
19
20
21
22
23
24
25
26
27
28
29
30
31
32
33
34
35
36
37
38
39
40
41
42
package com.example.part_04_designPattern.demo002;

import java.util.concurrent.ConcurrentHashMap;
import java.util.concurrent.ConcurrentLinkedQueue;

public class Worker implements Runnable {

private ConcurrentLinkedQueue<Task> workQueue;
private ConcurrentHashMap<String, Object> resultMap;

public void setWorkQueue(ConcurrentLinkedQueue<Task> workQueue) {
this.workQueue = workQueue;
}

public void setResultMap(ConcurrentHashMap<String, Object> resultMap) {
this.resultMap = resultMap;
}

@Override
public void run() {
while (true) {
Task input = this.workQueue.poll();
if (input == null)
break;
Object output = handle(input);
this.resultMap.put(Integer.toString(input.getId()), output);
}
}

private Object handle(Task input) {
Object output = null;
try {
// 处理任务的耗时。。 比如说进行操作数据库。。。
Thread.sleep(500);
output = input.getPrice();
} catch (InterruptedException e) {
e.printStackTrace();
}
return output;
}

}
1
2
3
4
5
6
7
8
9
10
11
12
13
14
15
16
17
18
19
20
21
22
23
24
25
26
27
28
29
30
31
package com.example.part_04_designPattern.demo002;

import java.util.Random;

public class Main {

public static void main(String[] args) {

Master master = new Master(new Worker(), 20);

Random r = new Random();
for (int i = 1; i <= 100; i++) {
Task t = new Task();
t.setId(i);
t.setPrice(r.nextInt(1000));
master.submit(t);
}
master.execute();
long start = System.currentTimeMillis();

while (true) {
if (master.isComplete()) {
long end = System.currentTimeMillis() - start;
int priceResult = master.getResult();
System.out.println("最终结果:" + priceResult + ", 执行时间:" + end);
break;
}
}

}
}

3、生产者-消费者

示例:
1
2
3
4
5
6
7
8
9
10
11
12
13
14
15
16
17
18
19
20
21
22
23
24
25
26
27
28
29
30
31
32
33
34
package com.example.part_04_designPattern.demo003;

public final class Data {

private String id;
private String name;

public Data(String id, String name) {
this.id = id;
this.name = name;
}

public String getId() {
return id;
}

public void setId(String id) {
this.id = id;
}

public String getName() {
return name;
}

public void setName(String name) {
this.name = name;
}

@Override
public String toString() {
return "{id: " + id + ", name: " + name + "}";
}

}
1
2
3
4
5
6
7
8
9
10
11
12
13
14
15
16
17
18
19
20
21
22
23
24
25
26
27
28
29
30
31
32
33
34
35
36
37
38
39
40
41
42
43
44
45
46
47
48
49
package com.example.part_04_designPattern.demo003;

import java.util.Random;
import java.util.concurrent.BlockingQueue;
import java.util.concurrent.TimeUnit;
import java.util.concurrent.atomic.AtomicInteger;

public class Provider implements Runnable {

// 共享缓存区
private BlockingQueue<Data> queue;
// 多线程间是否启动变量,有强制从主内存中刷新的功能。即时返回线程的状态
private volatile boolean isRunning = true;
// id生成器
private static AtomicInteger count = new AtomicInteger();
// 随机对象
private static Random r = new Random();

public Provider(BlockingQueue<Data> queue) {
this.queue = queue;
}

@Override
public void run() {
while (isRunning) {
try {
// 随机休眠0 - 1000 毫秒 表示获取数据(产生数据的耗时)
Thread.sleep(r.nextInt(1000));
// 获取的数据进行累计...
int id = count.incrementAndGet();
// 比如通过一个getData方法获取了
Data data = new Data(Integer.toString(id), "数据" + id);
System.out
.println("当前线程:" + Thread.currentThread().getName() + ", 获取了数据,id为:" + id + ", 进行装载到公共缓冲区中...");
if (!this.queue.offer(data, 2, TimeUnit.SECONDS)) {
System.out.println("提交缓冲区数据失败....");
// do something... 比如重新提交
}
} catch (InterruptedException e) {
e.printStackTrace();
}
}
}

public void stop() {
this.isRunning = false;
}

}
1
2
3
4
5
6
7
8
9
10
11
12
13
14
15
16
17
18
19
20
21
22
23
24
25
26
27
28
29
30
31
package com.example.part_04_designPattern.demo003;

import java.util.Random;
import java.util.concurrent.BlockingQueue;

public class Consumer implements Runnable {

private BlockingQueue<Data> queue;

public Consumer(BlockingQueue<Data> queue) {
this.queue = queue;
}

// 随机对象
private static Random r = new Random();

@Override
public void run() {
while (true) {
try {
// 获取数据
Data data = this.queue.take();
// 进行数据处理。休眠0 - 1000毫秒模拟耗时
Thread.sleep(r.nextInt(1000));
System.out.println("当前消费线程:" + Thread.currentThread().getName() + ", 消费成功,消费数据为id: " + data.getId());
} catch (InterruptedException e) {
e.printStackTrace();
}
}
}
}
1
2
3
4
5
6
7
8
9
10
11
12
13
14
15
16
17
18
19
20
21
22
23
24
25
26
27
28
29
30
31
32
33
34
35
36
37
38
39
40
41
42
43
44
45
46
47
48
package com.example.part_04_designPattern.demo003;

import java.util.concurrent.BlockingQueue;
import java.util.concurrent.ExecutorService;
import java.util.concurrent.Executors;
import java.util.concurrent.LinkedBlockingQueue;

public class Main {

public static void main(String[] args) throws Exception {
// 内存缓冲区
BlockingQueue<Data> queue = new LinkedBlockingQueue<Data>(10);
// 生产者
Provider p1 = new Provider(queue);
Provider p2 = new Provider(queue);
Provider p3 = new Provider(queue);
// 消费者
Consumer c1 = new Consumer(queue);
Consumer c2 = new Consumer(queue);
Consumer c3 = new Consumer(queue);
// 创建线程池运行,这是一个缓存的线程池,可以创建无穷大的线程,没有任务的时候不创建线程。空闲线程存活时间为60s(默认值)
ExecutorService cachePool = Executors.newCachedThreadPool();
cachePool.execute(p1);
cachePool.execute(p2);
cachePool.execute(p3);
cachePool.execute(c1);
cachePool.execute(c2);
cachePool.execute(c3);

try {
Thread.sleep(3000);
} catch (InterruptedException e) {
e.printStackTrace();
}
p1.stop();
p2.stop();
p3.stop();
try {
Thread.sleep(2000);
} catch (InterruptedException e) {
e.printStackTrace();
}
// cachePool.shutdown();
// cachePool.shutdownNow();

}

}

执行结果:

1
2
3
4
5
6
7
8
9
10
11
12
13
14
15
16
17
18
19
20
21
22
23
24
25
26
27
28
29
30
31
32
33
34
35
36
37
38
39
40
41
42
43
44
45
46
当前线程:pool-1-thread-3, 获取了数据,id为:1, 进行装载到公共缓冲区中...
当前线程:pool-1-thread-1, 获取了数据,id为:2, 进行装载到公共缓冲区中...
当前线程:pool-1-thread-2, 获取了数据,id为:3, 进行装载到公共缓冲区中...
当前线程:pool-1-thread-1, 获取了数据,id为:4, 进行装载到公共缓冲区中...
当前消费线程:pool-1-thread-4, 消费成功,消费数据为id: 1
当前线程:pool-1-thread-3, 获取了数据,id为:5, 进行装载到公共缓冲区中...
当前消费线程:pool-1-thread-5, 消费成功,消费数据为id: 2
当前消费线程:pool-1-thread-5, 消费成功,消费数据为id: 5
当前消费线程:pool-1-thread-6, 消费成功,消费数据为id: 3
当前线程:pool-1-thread-2, 获取了数据,id为:6, 进行装载到公共缓冲区中...
当前线程:pool-1-thread-3, 获取了数据,id为:7, 进行装载到公共缓冲区中...
当前线程:pool-1-thread-1, 获取了数据,id为:8, 进行装载到公共缓冲区中...
当前消费线程:pool-1-thread-6, 消费成功,消费数据为id: 7
当前线程:pool-1-thread-3, 获取了数据,id为:9, 进行装载到公共缓冲区中...
当前线程:pool-1-thread-3, 获取了数据,id为:10, 进行装载到公共缓冲区中...
当前线程:pool-1-thread-1, 获取了数据,id为:11, 进行装载到公共缓冲区中...
当前线程:pool-1-thread-1, 获取了数据,id为:12, 进行装载到公共缓冲区中...
当前消费线程:pool-1-thread-6, 消费成功,消费数据为id: 8
当前消费线程:pool-1-thread-4, 消费成功,消费数据为id: 4
当前消费线程:pool-1-thread-4, 消费成功,消费数据为id: 10
当前线程:pool-1-thread-3, 获取了数据,id为:13, 进行装载到公共缓冲区中...
当前消费线程:pool-1-thread-5, 消费成功,消费数据为id: 6
当前线程:pool-1-thread-3, 获取了数据,id为:14, 进行装载到公共缓冲区中...
当前线程:pool-1-thread-2, 获取了数据,id为:15, 进行装载到公共缓冲区中...
当前线程:pool-1-thread-2, 获取了数据,id为:16, 进行装载到公共缓冲区中...
当前消费线程:pool-1-thread-5, 消费成功,消费数据为id: 12
当前消费线程:pool-1-thread-4, 消费成功,消费数据为id: 11
当前线程:pool-1-thread-1, 获取了数据,id为:17, 进行装载到公共缓冲区中...
当前线程:pool-1-thread-3, 获取了数据,id为:18, 进行装载到公共缓冲区中...
当前消费线程:pool-1-thread-6, 消费成功,消费数据为id: 9
当前线程:pool-1-thread-2, 获取了数据,id为:19, 进行装载到公共缓冲区中...
当前消费线程:pool-1-thread-5, 消费成功,消费数据为id: 13
当前线程:pool-1-thread-1, 获取了数据,id为:20, 进行装载到公共缓冲区中...
当前消费线程:pool-1-thread-5, 消费成功,消费数据为id: 16
当前消费线程:pool-1-thread-4, 消费成功,消费数据为id: 14
当前线程:pool-1-thread-3, 获取了数据,id为:21, 进行装载到公共缓冲区中...
当前消费线程:pool-1-thread-4, 消费成功,消费数据为id: 18
当前消费线程:pool-1-thread-6, 消费成功,消费数据为id: 15
当前线程:pool-1-thread-1, 获取了数据,id为:22, 进行装载到公共缓冲区中...
当前线程:pool-1-thread-2, 获取了数据,id为:23, 进行装载到公共缓冲区中...
当前消费线程:pool-1-thread-5, 消费成功,消费数据为id: 17
当前消费线程:pool-1-thread-5, 消费成功,消费数据为id: 21
当前消费线程:pool-1-thread-4, 消费成功,消费数据为id: 19
当前消费线程:pool-1-thread-5, 消费成功,消费数据为id: 22
当前消费线程:pool-1-thread-6, 消费成功,消费数据为id: 20
当前消费线程:pool-1-thread-4, 消费成功,消费数据为id: 23

4、单例&多线程

​ 单例模式,最常见的就是饥饿模式和懒汉模式,一个直接实例化对象,一个在调用方法时进行实例化对象。

​ 在多线程模式中,考虑到性能和线程安全问题,我们一般选用下面两种比较经典的单例模式,在性能提高的同时,又保证了线程的安全:

  • Double check instance
  • static inner class
示例—Double check instance:
1
2
3
4
5
6
7
8
9
10
11
12
13
14
15
16
17
18
19
20
21
22
23
24
25
26
27
28
29
30
31
32
33
34
35
36
37
38
39
40
41
42
43
44
45
46
47
48
49
50
51
52
53
54
55
56
57
58
59
60
61
62
63
64
65
66
67
68
69
70
71
72
73
74
75
76
77
78
79
80
81
82
83
84
85
86
87
88
89
90
91
package com.example.part_04_designPattern.demo004;

/**
* 使用双重校验的方式实现单例模式
*/
public class DoubleCheckSingleton {

// 注意volatie!!!
private static volatile DoubleCheckSingleton ds;

private DoubleCheckSingleton() {

}

// 静态方法只有在调用的时候才会执行,不会在类加载时候执行,所以ds初始化不会在类加载时候初始化,这样的好处就是,万一应用从始至终就没使用ds,不会造成资源浪费
public static DoubleCheckSingleton getDs() {
if (ds == null) { // 注意此处:当最开始的时候,可能多个线程同时进入方法,所有线程判断此时的ds都为null,全部进入if代码块
try {
// 模拟初始化对象的准备时间...
Thread.sleep(3000);
} catch (InterruptedException e) {
e.printStackTrace();
}
synchronized (DoubleCheckSingleton.class) {
if (ds == null) { // 注意此处:多线程同时初始化ds的时候,一定要加上二次校验,防止初始化多次

/**
* 此处对ds变量使用volatile修饰做出解释:
* 这里的 volatile 关键字主要是为了防止指令重排。
* ds = new DoubleCheckSingleton();这段代码其实是分为三步:
* (1)分配内存空间。
* (2)初始化对象。
* (3)将 singleton 对象指向分配的内存地址。
* 加上 volatile 是为了让以上的三步操作顺序执行,
* 反之有可能第三步在第二步之前被执行就有可能导致某个线程拿到的单例对象还没有初始化,以致于使用报错
*/

ds = new DoubleCheckSingleton();
}
}
}
return ds;
}

public static void main(String[] args) {
Thread t1 = new Thread(new Runnable() {
@Override
public void run() {
System.out.println(DoubleCheckSingleton.getDs().hashCode());
}
}, "t1");
Thread t2 = new Thread(new Runnable() {
@Override
public void run() {
System.out.println(DoubleCheckSingleton.getDs().hashCode());
}
}, "t2");
Thread t3 = new Thread(new Runnable() {
@Override
public void run() {
System.out.println(DoubleCheckSingleton.getDs().hashCode());
}
}, "t3");
Thread t4 = new Thread(new Runnable() {
@Override
public void run() {
System.out.println(DoubleCheckSingleton.getDs().hashCode());
}
}, "t4");
Thread t5 = new Thread(new Runnable() {
@Override
public void run() {
System.out.println(DoubleCheckSingleton.getDs().hashCode());
}
}, "t5");
Thread t6 = new Thread(new Runnable() {
@Override
public void run() {
System.out.println(DoubleCheckSingleton.getDs().hashCode());
}
}, "t6");

t1.start();
t2.start();
t3.start();
t4.start();
t5.start();
t6.start();
}

}

执行结果:

1
2
3
4
5
6
1546272580
1546272580
1546272580
1546272580
1546272580
1546272580
示例—static inner class:
1
2
3
4
5
6
7
8
9
10
11
12
13
14
15
16
17
18
19
20
21
22
23
24
25
26
27
28
29
30
31
32
33
34
35
36
37
38
39
40
41
42
43
44
45
46
47
48
49
50
51
52
53
54
55
56
57
58
59
60
61
62
63
64
65
66
67
package com.example.part_04_designPattern.demo004;

/**
* 静态内部类的方式实现单例模式
*/
public class Singleton {

private Singleton() {

}

// 静态内部类只有在调用的时候才会初始化,不会在外部类加载时候初始化,所以ds初始化不会在外部类加载时候初始化,这样的好处就是,万一应用从始至终就没使用ds,不会造成资源浪费
private static class InnerSingleton {
private static Singleton single = new Singleton();
}

public static Singleton getInstance() {
return InnerSingleton.single;
}

public static void main(String[] args) {
Thread t1 = new Thread(new Runnable() {
@Override
public void run() {
System.out.println(Singleton.getInstance().hashCode());
}
}, "t1");
Thread t2 = new Thread(new Runnable() {
@Override
public void run() {
System.out.println(Singleton.getInstance().hashCode());
}
}, "t2");
Thread t3 = new Thread(new Runnable() {
@Override
public void run() {
System.out.println(Singleton.getInstance().hashCode());
}
}, "t3");
Thread t4 = new Thread(new Runnable() {
@Override
public void run() {
System.out.println(Singleton.getInstance().hashCode());
}
}, "t4");
Thread t5 = new Thread(new Runnable() {
@Override
public void run() {
System.out.println(Singleton.getInstance().hashCode());
}
}, "t5");
Thread t6 = new Thread(new Runnable() {
@Override
public void run() {
System.out.println(Singleton.getInstance().hashCode());
}
}, "t6");

t1.start();
t2.start();
t3.start();
t4.start();
t5.start();
t6.start();
}

}

执行结果:

1
2
3
4
5
6
1983483740
1983483740
1983483740
1983483740
1983483740
1983483740
文章目录
  1. 1、Future模式
  2. 2、Master-Worker模式
  3. 3、生产者-消费者
  4. 4、单例&多线程