文章目录
  1. 1、Buffer的基本用法
  2. 2、Buffer的工作原理
  3. 3、Buffer的类型
  4. 4、Buffer的分配
  5. 5、向Buffer中写数据
  6. 6、从Buffer中读数据
  7. 7、从Buffer中重复读取数据
  8. 8、clear()和compact()方法
  9. 9、mark()和reset()方法

1、Buffer的基本用法

​ 使用Buffer读写数据一般遵循以下四个步骤:

  1. 写入数据到Buffer

  2. 调用flip()方法

  3. 从Buffer中读取数据

  4. 调用clear()方法或者compact()方法

    当向buffer写入数据时,buffer会记录下写了多少数据。一旦要读取数据,需要通过flip()方法将Buffer从写模式切换到读模式。在读模式下,可以读取之前写入到buffer的所有数据。

    一旦读完了所有的数据,就需要清空缓冲区,让它可以再次被写入。有两种方式能清空缓冲区:调用clear()compact()方法。clear()方法会清空整个缓冲区。compact()方法只会清除已经读过的数据。任何未读的数据都被移到缓冲区的起始处,新写入的数据将放到缓冲区未读数据的后面。

示例:
1
2
3
4
5
6
7
8
9
10
11
12
13
14
15
16
17
18
19
20
21
22
23
24
25
26
27
28
29
30
31
32
33
34
35
36
37
38
39
40
41
42
43
44
45
46
47
48
49
50
51
package com.example.part_02_nio.demo004;

import java.io.IOException;
import java.io.RandomAccessFile;
import java.nio.ByteBuffer;
import java.nio.channels.FileChannel;
import java.util.ArrayList;
import java.util.List;

public class UseFileChannel {
public static void main(String[] args) throws IOException {
RandomAccessFile aFile = new RandomAccessFile("data/nio-data.txt", "rw");
FileChannel inChannel = aFile.getChannel();

// create buffer with capacity of 48 bytes
ByteBuffer buf = ByteBuffer.allocate(48);

List<byte[]> byteList = new ArrayList<>(); // 从channel中每次read到的byte[]
int allLength = 0; // 所有循环之后,read到的总byte[]长度

int bytesRead = inChannel.read(buf); // read into buffer.
while (bytesRead != -1) {

buf.flip(); // make buffer ready for read

byte[] bytes = new byte[bytesRead]; // 用于存储本次循环read到的byte[]
allLength += bytesRead;

int index = 0;
while (buf.hasRemaining()) {
bytes[index] = buf.get();
index++;
// System.out.print((char) buf.get()); // read 1 byte at a time
}
byteList.add(bytes);

buf.clear(); // make buffer ready for writing
bytesRead = inChannel.read(buf);
}
aFile.close();

byte[] all = new byte[allLength]; // 把每次循环read到的byte[]归并到一个总的数组中
int current = 0;
for (byte[] bs : byteList) {
System.arraycopy(bs, 0, all, current, bs.length);
current += bs.length;
}

System.out.println(new String(all));
}
}

2、Buffer的工作原理

​ 缓冲区本质上是一块可以写入数据,然后可以从中读取数据的内存。这块内存被包装成NIO Buffer对象,并提供了一组方法,用来方便的访问这块内存。

​ 为了理解Buffer的工作原理,需要熟悉它的三个属性:

  • capacity

  • position

  • limit

    position和limit的含义取决于Buffer处在读模式还是写模式。不管Buffer处在什么模式,capacity的含义总是一样的。
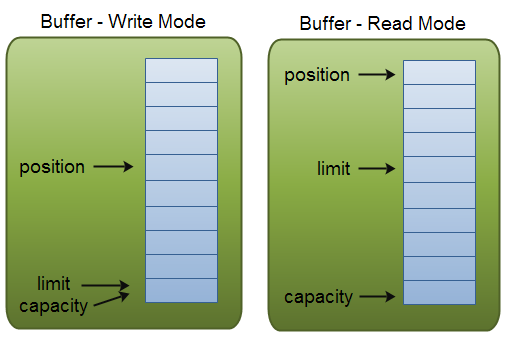
  • capacity

    作为一个内存块,Buffer有一个固定的大小值,也叫“capacity”。你只能往里写capacity个byte、long、char等类型。一旦Buffer满了,需要将其清空(通过读数据或者清除数据)才能继续写数据往里写数据。

  • position

    当你写数据到Buffer中时,position表示当前的位置。初始的position值为0。当一个byte、long等数据写到Buffer后, position会向前移动到下一个可插入数据的Buffer单元。position最大可为capacity – 1。

    当读取数据时,也是从某个特定位置读。当将Buffer从写模式切换到读模式,position会被重置为0。当从Buffer的position处读取数据时,position向前移动到下一个可读的位置。

  • limit

    在写模式下,Buffer的limit表示你最多能往Buffer里写多少数据。 写模式下,limit等于Buffer的capacity。

    当切换Buffer到读模式时, limit表示你最多能读到多少数据。因此,当切换Buffer到读模式时,limit会被设置成写模式下的position值。换句话说,你能读到之前写入的所有数据(limit被设置成已写数据的数量,这个值在写模式下就是position)。

3、Buffer的类型

  • ByteBuffer
  • CharBuffer
  • DoubleBuffer
  • FloatBuffer
  • IntBuffer
  • LongBuffer
  • ShortBuffer

4、Buffer的分配

​ 要想获得一个Buffer对象首先要进行分配。 每一个Buffer类都有一个allocate方法。

1
2
// create buffer with capacity of 48 bytes
ByteBuffer buf = ByteBuffer.allocate(48);

​ 也可以通过wrap方法,获得一个Buffer对象,wrap方法说明:

1
2
3
4
5
6
7
8
9
10
11
12
13
14
15
16
17
18
19
/**
* Wraps a byte array into a buffer.
*
* <p> The new buffer will be backed by the given byte array;
* that is, modifications to the buffer will cause the array to be modified
* and vice versa. The new buffer's capacity and limit will be
* <tt>array.length</tt>, its position will be zero, and its mark will be
* undefined. Its {@link #array backing array} will be the
* given array, and its {@link #arrayOffset array offset>} will
* be zero. </p>
*
* @param array
* The array that will back this buffer
*
* @return The new byte buffer
*/
public static ByteBuffer wrap(byte[] array) {
return wrap(array, 0, array.length);
}

wrap方法使用方法:

1
ByteBuffer buffer = ByteBuffer.wrap("data".getBytes());

5、向Buffer中写数据

​ 写数据到Buffer有两种方式:

  1. 从Channel写到Buffer。

    1
    int bytesRead = inChannel.read(buf); //read into buffer.
  2. 通过Buffer的put()方法写到Buffer里,put方法有很多版本,允许你以不同的方式把数据写入到Buffer中。例如, 写到一个指定的位置,或者把一个字节数组写入到Buffer。

    1
    buf.put(127);

6、从Buffer中读数据

​ 从Buffer中读取数据有两种方式:

  1. 从Buffer读取数据到Channel。

    1
    2
    //read from buffer into channel.
    int bytesWritten = inChannel.write(buf);
  2. 使用get()方法从Buffer中读取数据。get方法有很多版本,允许你以不同的方式从Buffer中读取数据。例如,从指定position读取,或者从Buffer中读取数据到字节数组。

    1
    byte aByte = buf.get();

7、从Buffer中重复读取数据

​ 可以使用rewind()方法。rewind()将position设回0,所以你可以重读Buffer中的所有数据。limit保持不变,仍然表示能从Buffer中读取多少个元素(byte、char等)。

8、clear()和compact()方法

​ 一旦读完Buffer中的数据,需要让Buffer准备好再次被写入。可以通过clear()或compact()方法来完成。

​ 如果调用的是clear()方法,position将被设回0,limit被设置成 capacity的值。换句话说,Buffer 被清空了。Buffer中的数据并未清除,只是这些标记告诉我们可以从哪里开始往Buffer里写数据。

​ 如果Buffer中有一些未读的数据,调用clear()方法,数据将“被遗忘”,意味着不再有任何标记会告诉你哪些数据被读过,哪些还没有。

​ 如果Buffer中仍有未读的数据,且后续还需要这些数据,但是此时想要先先写些数据,那么使用compact()方法。

​ compact()方法将所有未读的数据拷贝到Buffer起始处。然后将position设到最后一个未读元素正后面。limit属性依然像clear()方法一样,设置成capacity。现在Buffer准备好写数据了,但是不会覆盖未读的数据。

9、mark()和reset()方法

​ 通过调用Buffer.mark()方法,可以标记Buffer中的一个特定position。之后可以通过调用Buffer.reset()方法恢复到这个position。例如:

1
2
3
buffer.mark();
//call buffer.get() a couple of times, e.g. during parsing.
buffer.reset(); //set position back to mark.

参考文章:http://ifeve.com/buffers/

文章目录
  1. 1、Buffer的基本用法
  2. 2、Buffer的工作原理
  3. 3、Buffer的类型
  4. 4、Buffer的分配
  5. 5、向Buffer中写数据
  6. 6、从Buffer中读数据
  7. 7、从Buffer中重复读取数据
  8. 8、clear()和compact()方法
  9. 9、mark()和reset()方法