文章目录
  1. 1、通道与流的区别
  2. 2、Channel的实现
  3. 3、ServerSocketChannel
    1. 3.1 打开ServerSocketChannel
    2. 3.2 关闭ServerSocketChannel
    3. 3.3 监听新进来的连接
    4. 3.4 非阻塞模式
  4. 4、SocketChannel
    1. 4.1 打开SocketChannel
    2. 4.2 关闭SocketChannel
    3. 4.3 读取数据
    4. 4.4 写入数据
    5. 4.5 非阻塞模式
    6. 4.6 非阻塞模式与选择器
  5. 5、FileChannel
    1. 5.1 打开FileChannel
    2. 5.2 读取数据
    3. 5.3 写入数据
    4. 5.4 关闭FileChannel
    5. 5.5 position()方法
    6. 5.6 size()方法
    7. 5.7 truncate()方法
    8. 5.8 force()方法
    9. 5.9 transferFrom()方法
    10. 5.10 transferTo()方法

1、通道与流的区别

​ Java NIO的通道类似流,但又有些不同:

  • 既可以从通道中读取数据,又可以写数据到通道。但流的读写通常是单向的。
  • 通道可以异步地读写。
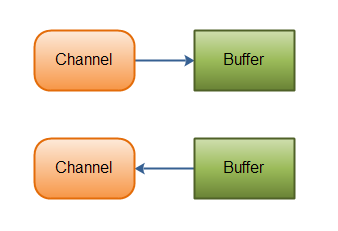
  • 通道中的数据总是要先读到一个Buffer,或者总是要从一个Buffer中写入。

2、Channel的实现

  • FileChannel:从文件中读写数据
  • DatagramChannel:能通过UDP读写网络中的数据
  • SocketChannel:能通过TCP读写网络中的数据
  • ServerSocketChannel:可以监听新进来的TCP连接,对每一个新进来的连接都会创建一个SocketChannel

3、ServerSocketChannel

3.1 打开ServerSocketChannel

1
ServerSocketChannel serverSocketChannel = ServerSocketChannel.open();

3.2 关闭ServerSocketChannel

1
serverSocketChannel.close();

3.3 监听新进来的连接

​ 通过 ServerSocketChannel.accept() 方法监听新进来的连接。当 accept()方法返回的时候,它返回一个包含新进来的连接的 SocketChannel。因此,accept()方法会一直阻塞到有新连接到达。通常不会仅仅只监听一个连接,在while循环中调用 accept()方法。

1
2
3
4
while(true){
SocketChannel socketChannel = serverSocketChannel.accept();
//do something with socketChannel...
}

3.4 非阻塞模式

​ ServerSocketChannel可以设置成非阻塞模式。在非阻塞模式下,accept() 方法会立刻返回,如果还没有新进来的连接,返回的将是null。 因此,需要检查返回的SocketChannel是否是null。

1
2
3
4
5
6
7
8
9
10
11
ServerSocketChannel serverSocketChannel = ServerSocketChannel.open();

serverSocketChannel.socket().bind(new InetSocketAddress(9999));
serverSocketChannel.configureBlocking(false);

while(true){
SocketChannel socketChannel = serverSocketChannel.accept();
if(socketChannel != null){
//do something with socketChannel...
}
}

4、SocketChannel

4.1 打开SocketChannel

1
2
SocketChannel socketChannel = SocketChannel.open();
socketChannel.connect(new InetSocketAddress("127.0.0.1", 80));

4.2 关闭SocketChannel

1
socketChannel.close();

4.3 读取数据

​ 首先,分配一个Buffer。从SocketChannel读取到的数据将会放到这个Buffer中。

​ 然后,调用SocketChannel.read()。该方法将数据从SocketChannel 读到Buffer中。read()方法返回的int值表示读了多少字节进Buffer里。如果返回的是-1,表示已经读到了流的末尾(连接关闭了)。

1
2
ByteBuffer buf = ByteBuffer.allocate(48);
int bytesRead = socketChannel.read(buf);

4.4 写入数据

​ 写数据到SocketChannel用的是SocketChannel.write()方法,该方法以一个Buffer作为参数。注意SocketChannel.write()方法的调用是在一个while循环中的。write()方法无法保证能写多少字节到SocketChannel。所以,我们重复调用write()直到Buffer没有要写的字节为止。

1
2
3
4
5
6
7
8
9
10
11
String newData = "New String to write to file..." + System.currentTimeMillis();

ByteBuffer buf = ByteBuffer.allocate(48);
buf.clear();
buf.put(newData.getBytes());

buf.flip();

while(buf.hasRemaining()) {
channel.write(buf);
}

4.5 非阻塞模式

​ 如果SocketChannel在非阻塞模式下,此时调用connect(),该方法可能在连接建立之前就返回了。为了确定连接是否建立,可以调用finishConnect()的方法。

1
2
3
4
5
6
socketChannel.configureBlocking(false);
socketChannel.connect(new InetSocketAddress("127.0.0.1", 80));

while(! socketChannel.finishConnect() ){
//wait, or do something else...
}

4.6 非阻塞模式与选择器

​ 非阻塞模式与选择器搭配会工作的更好,通过将一或多个SocketChannel注册到Selector,可以询问选择器哪个通道已经准备好了读取,写入等。

5、FileChannel

5.1 打开FileChannel

​ 在使用FileChannel之前,必须先打开它。但是,我们无法直接打开一个FileChannel,需要通过使用一个InputStream、OutputStream或RandomAccessFile来获取一个FileChannel实例。

1
2
RandomAccessFile aFile = new RandomAccessFile("data/nio-data.txt", "rw");
FileChannel inChannel = aFile.getChannel();

5.2 读取数据

​ 首先,分配一个Buffer。从FileChannel中读取的数据将被读到Buffer中。

​ 然后,调用FileChannel.read()方法。该方法将数据从FileChannel读取到Buffer中。read()方法返回的int值表示了有多少字节被读到了Buffer中。如果返回-1,表示到了文件末尾。

1
2
ByteBuffer buf = ByteBuffer.allocate(48);
int bytesRead = inChannel.read(buf);

5.3 写入数据

​ 使用FileChannel.write()方法向FileChannel写数据,该方法的参数是一个Buffer。注意FileChannel.write()是在while循环中调用的。因为无法保证write()方法一次能向FileChannel写入多少字节,因此需要重复调用write()方法,直到Buffer中已经没有尚未写入通道的字节。

1
2
3
4
5
6
7
8
9
10
11
String newData = "New String to write to file..." + System.currentTimeMillis();

ByteBuffer buf = ByteBuffer.allocate(48);
buf.clear();
buf.put(newData.getBytes());

buf.flip();

while(buf.hasRemaining()) {
channel.write(buf);
}

5.4 关闭FileChannel

1
channel.close();

5.5 position()方法

​ 有时可能需要在FileChannel的某个特定位置进行数据的读/写操作。可以通过调用position()方法获取FileChannel的当前位置。也可以通过调用position(long pos)方法设置FileChannel的当前位置。

​ 如果将位置设置在文件结束符之后,然后试图从文件通道中读取数据,读方法将返回-1 —— 文件结束标志。

​ 如果将位置设置在文件结束符之后,然后向通道中写数据,文件将撑大到当前位置并写入数据。这可能导致“文件空洞”,磁盘上物理文件中写入的数据间有空隙。

1
2
long pos = channel.position();
channel.position(pos +123);

5.6 size()方法

​ size()方法将返回该实例所关联文件的大小。

5.7 truncate()方法

​ 可以使用FileChannel.truncate()方法截取一个文件。截取文件时,文件将中指定长度后面的部分将被删除。

1
channel.truncate(1024);

5.8 force()方法

​ force()方法将通道里尚未写入磁盘的数据强制写到磁盘上。出于性能方面的考虑,操作系统会将数据缓存在内存中,所以无法保证写入到FileChannel里的数据一定会即时写到磁盘上。要保证这一点,需要调用force()方法。force()方法有一个boolean类型的参数,指明是否同时将文件元数据(权限信息等)写到磁盘上。

1
channel.force(true);

5.9 transferFrom()方法

​ 在Java NIO中,如果两个通道中有一个是FileChannel,那你可以直接将数据从一个channel传输到另外一个channel。

​ FileChannel的transferFrom()方法可以将数据从源通道传输到FileChannel中。

1
2
3
4
5
6
7
8
9
10
11
12
13
14
15
16
17
18
19
20
21
22
23
24
25
26
package com.example.part_02_nio.demo004;

import java.io.IOException;
import java.io.RandomAccessFile;
import java.nio.channels.FileChannel;

/**
* 使用FileChannle,把一个channel中的数据传输到另一个channel
*/
public class UseFileChannel2 {
public static void main(String[] args) throws IOException {
RandomAccessFile fromFile = new RandomAccessFile("data/nio-data.txt", "rw");
FileChannel fromChannel = fromFile.getChannel();

RandomAccessFile toFile = new RandomAccessFile("data/toFile.txt", "rw");
FileChannel toChannel = toFile.getChannel();

long position = 0;
long count = fromChannel.size();

toChannel.transferFrom(fromChannel, position, count);

fromChannel.close();
toChannel.close();
}
}

5.10 transferTo()方法

​ transferTo()方法将数据从FileChannel传输到其他的channel中。

1
2
3
4
5
6
7
8
9
10
11
12
13
14
15
16
17
18
19
20
21
22
23
24
25
26
package com.example.part_02_nio.demo004;

import java.io.IOException;
import java.io.RandomAccessFile;
import java.nio.channels.FileChannel;

/**
* 使用FileChannle,把一个channel中的数据传输到另一个channel
*/
public class UseFileChannel2 {
public static void main(String[] args) throws IOException {
RandomAccessFile fromFile = new RandomAccessFile("data/nio-data.txt", "rw");
FileChannel fromChannel = fromFile.getChannel();

RandomAccessFile toFile = new RandomAccessFile("data/toFile.txt", "rw");
FileChannel toChannel = toFile.getChannel();

long position = 0;
long count = fromChannel.size();

fromChannel.transferTo(position, count, toChannel);

fromChannel.close();
toChannel.close();
}
}

参考文章:

http://ifeve.com/channels/

http://ifeve.com/file-channel/

http://ifeve.com/socket-channel/

http://ifeve.com/server-socket-channel/

文章目录
  1. 1、通道与流的区别
  2. 2、Channel的实现
  3. 3、ServerSocketChannel
    1. 3.1 打开ServerSocketChannel
    2. 3.2 关闭ServerSocketChannel
    3. 3.3 监听新进来的连接
    4. 3.4 非阻塞模式
  4. 4、SocketChannel
    1. 4.1 打开SocketChannel
    2. 4.2 关闭SocketChannel
    3. 4.3 读取数据
    4. 4.4 写入数据
    5. 4.5 非阻塞模式
    6. 4.6 非阻塞模式与选择器
  5. 5、FileChannel
    1. 5.1 打开FileChannel
    2. 5.2 读取数据
    3. 5.3 写入数据
    4. 5.4 关闭FileChannel
    5. 5.5 position()方法
    6. 5.6 size()方法
    7. 5.7 truncate()方法
    8. 5.8 force()方法
    9. 5.9 transferFrom()方法
    10. 5.10 transferTo()方法